Barrow Mound, Jotunheim
This part starts from the beginning of the game after the introductory cutscene.
|
As soon as you wake up run north and continue following the path across the bridge and through the cave until you reach the first root blocking your path. Chop through the root and run northwest following the stone pathway while using heavy attacks on the next two roots blocking your way until you reach the swamp. From the beginning of the swamp continue following the stone path until you reach a grassy area again with a spirit on top of a glyph. Run next to the spirit and it will disappear activating the green glyph below it. Run northwest following the stone pathway through the swamp and back onto a grassy area. As you pass underneath the trees you will reach Mimir’s Pond. Run north past Mimir’s Pond and you will reach a Glade with a sealed cave, two inactive glyphs and one active green glyph.
|

|
|
From there, run northwest following the stone pathway to the swamp. Run northwest through the swamp until you reach a spirit on top of the red glyph. Run east through the swamp until you reach the grassy area where you will see Friggs God Statue. Run east from Friggs God Statue using your heavy attack on the next three roots blocking your path while being careful to avoid the thorny roots that appear from underground to attack you. After chopping through the third root, continue running south to see a spirit on top of a blue glyph. As soon as you move near the blue glyph at least thirty thorny roots will appear from underground to attack you.
|

|
|
From there continue running south underneath the trees until you reach the next root blocking your path. Chop the fourth root and continue following the stone pathway chopping the next two roots until you reach the three active glyphs in the sealed cave once again in the Glade. As you near the Glade and walk towards the front of the sealed cave and the spirits will disappear. The sealed cave will then unseal and the boss will appear from within the cave and it will once again become sealed.
|

|
|
The Skeleton Warrior of Barrow Mound is a simple boss since it's slow and only attacks similar to your own basic attack. To defeat it, use heavy attack until it grows to be at least twice your height and you’re able to dodge between his legs. As soon as you see the boss wind up for an attack dodge between its legs, turn around and use your heavy attack. Continue doing this pattern until the boss falls into pieces.
|

|
|
From the entrance of Brokkr's Forge run south until you see a bridge that crosses to the northwest. Cross the bridge until the screen starts to zoom out. From there run north until you reach the city. Once you reach the city, run northeast until you reach the stairs going up to the northwest. Run west from the top of the stairs past the Dwarves running away from you and continue until you're able to go southwest. From there run southwest and follow that path until you see a damaged bridge to the northwest. Run onto the bridge and cross it. At the end of the bridge will be a large group of Dwarves. Stand still and swing your axe as they run towards you in order to safely kill them.
|

|
|
After defeating the large group of Dwarves run southwest until you reach a bridge that crosses to the west. As you cross the bridge you will see the screen zoom out. After crossing the bridge immediately turn south and run between the two pillars continuing along that path defeating another large group of Dwarves until you're able to turn to the northwest. Run northwest and up the stairs. At the top of the stairs run east, then southeast as you run between six pillars. Continue southeast until you reach Mimir's Pond. From Mimir’s Pond run down the stairs to your east. At the bottom of the stairs run south until you reach another damaged bridge. Continue running southeast across the damaged bridge until you reach the other side. Once you reach the other side run east.
|

|
|
You will see Dwarves running to the northwest. Follow them towards a large group of Dwarves and you will immediately be attacked. The smaller Dwarves are not a problem and will only take a basic attack to defeat them. To safely defeat the larger Dwarves, hit the hammers they throw at you and it will ricochet back at them in a line and any dwarf in its path will receive damage. When all the Dwarves are defeated continue running northeast until you reach the Brokkr’s Forge Rune.
|

|
|
From the entrance of Jormungandr’s Lake, run directly northeast until you reach shattered ice allowing you to see the water. From the shattered ice run slightly northwest until you run into a larger area of shattered ice. From there run northeast following the edge of the shattered ice. Once you reach the northeast tip of the large area of shattered ice immediately turn northeast. At this point, Jormungandr will come out to attack you.
|

|
|
If it does the screen will zoom out far enough for you to see the exact location of the Jormungandr Lakes Rune. If not, run a little short ways north-northwest until you reach the Jormungandr Lakes Rune in between two small shattered areas of ice.
|

|
|
From the entrance of the Roots of Yggdrasil run west and slide down the roots at the end. Slide down the roots to the southeast. Run east and slide down the roots at the end. At the bottom, immediately run south and slide down the root going down to the southwest. Immediately run southeast and go down the root going down southwest beside a waterfall. Run southeast and go down the root going down to the southeast. From there run east and go down the root that's going down to the southwest. Next, run west while dodging the falling boulders. Continue running west past the waterfall until you see roots going down to the south. Slide down those roots and continue south until you see Mimir’s Pond.
|

|
|
From Mimir’s Pond run southwest and slide down the roots going down to the southwest. Run west and slide down the root going south. As you slide down this root hold the down button which allows you to enter a shortcut to reach the Rune much faster. As you continue sliding down the thin root you will slide back onto a thick root at which point you will need to dodge falling boulders. If you stay along the southern edge of the root you should avoid getting hit by all the boulders. Once you reach the end of the root step onto the stone slab in front of Brokkr's Forge Rune to acquire it.
|

|
|
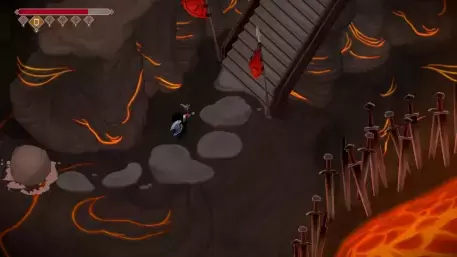
From the entrance of the Crater run south until you see stairs going up to the northeast. Immediately at the top of the stairs run south avoiding the Fire Giant throwing boulders until you reach the bridge that crosses to the west. After crossing the bridge to the west immediately turn south avoiding the two Fire Giants throwing the boulder at you until you reach the stairs going down to the southwest. After going down the stairs turn southeast and continue until you reach the stairs going up to the northwest.
|

|
|
At the top of stairs continue running northeast, avoiding the three Fire Giants throwing boulders at you until you reach the bridge that crosses to the east. Cross the bridge east until you reach the end of the bridge at which point you should immediately turn south and go down the next two stairs that are going southwest. At the bottom of the second stairs immediately turn north and continue running until you reach the stairs going up to the northeast. From the top run northeast and cross the bridge to the east until you reach an elevator that will bring you down to the lower area.
|

|
|
Once you reach the lower area continue running east until you see stairs going down to the southeast and two Fire Giants. Run down the stairs and then run east to activate Mimir's Pool. Return to the stairs and run west until you see stairs going down to the southeast. From the bottom of those stairs run to the southeast until you see a bridge made of stone boulders. Cross the stone bridge to the east to the next island immediately turn south and cross the next stone bridge. Run south until you reach the lava river and see a Fire Giant throwing boulders at you. Wait for the Fire Giant to throw a boulder at you and dodge to make sure it doesn’t shatter. Use a heavy attack on the boulder and aim towards the lava river in order to have the boulder fall into the lava and create a bridge to the other side.
|

|
|
After creating the stone bridge run southeast across it and immediately turn south and cross the next stone bridge on to the next island. Run south under the bridge and continue until you see another Fire Giant throwing a boulder at you. Again, create another stone bridge using thrown boulders. After creating the stone bridge, cross it to the next island. Run past the Fire Giant and continue southeast. Cross the next stone bridge south onto another island and from there continue southeast until you see a Fire Giant to your right across the lava river. Be aware that two Fire Giants will appear to your left immediately after the Fire Giant to your right throws a boulder. Create another stone bridge that allow you to reach the island to the east.
|

|
|
After creating the stone bridge run across it and immediately run northeast until you reach the stairs going up to the northeast. Run up the stairs and at the top run west and go up the next stairs to the northeast. From there run west and cross the bridge to the west until you reach the other side. Immediately turn south and go down the stairs to the southeast being aware that two Fire Giants will appear next to the stairs as you approach. At the bottom of the stairs run west until you reach Mimir's Pond.
|

|
|
From Mimir’s Pond go down the stairs you see to your south and run to the southeast. At the bottom of the stairs run northwest until you see a Fire Giant on the other side of the lava river. Create another stone bridge to reach that island. Run to the west side of the island and create another stone bridge to reach the island to your west with a Fire Giant and stairs going up to the northwest. After crossing the bridge run west and go up the stairs to the northwest. At the top of the stairs run west and go down the stairs to the southwest. Cross the stone bridge and continue running south around the cliff until you reach the stairs going up to the northeast
|
|
|
At the top of the stairs run east until you reach another set of stairs going up to the northeast. At the top of those stairs run west avoiding the Fire Giant at the start of the bridge while running across it to the west. As you step onto the bridge four Fire Giants will appear. Dodge through them and continue running west until you reach the end of the bridge. At the end of the Bridge run west and step on the stone slab in front of the Craters Rune to acquire it.
|

|
|
From the entrance of the Nine Rivers run northwest past the stone wall until you reach ice spikes blocking the branching path. Hit the ice spikes to break them and take the branching path west to the next island. Run west past the red statue and immediately turn north until you see a stone wall. From the stone wall run northwest onto the path on the ice to the left of the red statues beside the stairs. Run north along the path until you reach the next island with a stone wall and Mimir’s Pond.
|

|
|
From Mimir’s Pond run northwest on to the next island blocked by two ice spikes. After breaking the two ice spikes run north past the stone wall on to the next island with a stone wall and an ice spike behind it. From the stone wall run west along the path on to a tiny island with a red statue. From the tiny island run west following the branching path and take the northeast path until you reach three ice spikes blocking your path on to the next island. After breaking the three ice spikes run north and take the northeast path on to the next island.
|

|
|
Continue running northeast past the red statue on to the next island with a stone wall. Run north until you reach a path that crosses to the northeast island. As you step onto the island run north until you stand between two large red statues. Continue running north, following that path until you step onto a stone slab in front of the Nine Rivers Rune to acquire it.
|

|
|
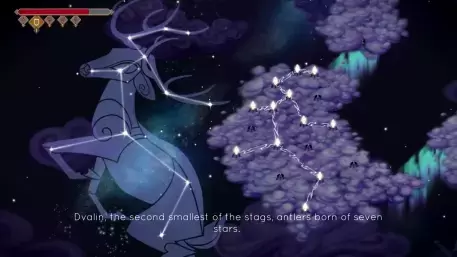
From the entrance of the Northern Sky run north across the light bridge to reach the next area.
|

|
|
From this area run west past the inactive Stonegate to the light bridge that crosses southwest into the next area. Cross the light bridge to the southwest and immediately run north until you reach the next light bridge.
|
|
|
Run north across the light bridge and continue past a lightning storm until you reach the next light bridge. Run across the light bridge and immediately run northeast until you see a light bridge on the eastside of this area.
|

|
|
Cross the light bridge and continue running east activating Mimir's Pond on the way until you reach the next light bridge to the southeast.
|

|
|
Cross the bridge and In this area be careful of the lightning bolts that are coming down from the sky and sparks coming from the dark patches of cloud and immediately run south until you reach the next light bridge.
|

|
|
Cross light bridge and again being careful of the two lightning storms shooting out sparks and lightning bolts coming down from the sky as you run southwest until you reach the next light bridge.
|

|
|
Cross the light bridge and you will be returned to the Stonegate which is now activated.
|

|
|
Once the light bridge appears to the north of the Stonegate, cross it and continue running north until you reach the stone slab in front of the Northern Sky Rune to acquire it.
|

|
|
From the entrance of Vethrfolnir’s Roost run east until you reach a standing branch with chop marks on it. Chop the standing branch and run northwest. Continue running northwest until you see another standing branch. Chop down the standing branch and run across it continuing to run east until you reach a thick branch. On the thick branch, run northwest until the screen zooms out and you hear an Vethrfolnir scream. As Vethrfolnir swoops down to attack you its shadow will get darker. At this point the easiest way to dodge it is to dodge towards it just as is about to attack you.
|

|
|
After dodging the Vethrfolnir’s attack run west until you see a standing branch. Chop down the standing branch and run across it. Run northeast until you reach the next standing branch. Chop down the standing branch and run across it. Run east following the branch until you reach another standing branch. Chop down the standing branch and run across it. Run northeast until you reach Mimir's Pond. From Mimir's Pond take the thick large branch to the north and follow it until you reach a standing branch.
|

|
|
Chop down to standing branch and run across it being careful as Vethrfolnir is going to swoop down and attack you once again. After the Vethrfolnir attacks run west past first standing branch until you reach the second standing branch. Chop the standing branch and run across the chopped branch and continue until you reach the next standing branch. Chop the standing branch and run across it while being careful as Vethrfolnir will come to attack you for a third time. After Vethrfolnir attacks you, run east and continue along that path until you reach a standing branch.
|

|
|
Chop down to standing branch and run across it, being careful as Vethrfolnir will attack you for a fourth time. After Vethrfolnir attacks, run west and continue along that path until you reach the stone slab in front of Vethrfolnir’s Roost Rune to acquire it.
|

|
|
From the entrance of Ymir's Blood run south until you see a standing tree. Chop down to standing tree and run west across it until you see a Piling with a boat in front of it. Step on the boat and use a heavy attack on the Piling to sail south. Run south until you reach a standing tree. Chop down the standing tree and run across it. Immediately run to the southeast and step onto the boat you’ll see. Use your heavy attack on the Piling to sail east. Run northeast and step on the boat. Use a heavy attack on the Piling to sail north. Run northeast and step on the first mural to activate it.
|

|
|
Run east and step onto the boat. Use your heavy attack on the Piling to sail east. Run east following the southern coastline until you reach the boat next to a large tree. Step onto the boat and use a heavy attack on the Piling to sail west. Run southwest and step on the boat you see. Use a heavy attack on the Piling to sail south. Run south while avoiding the scorched cracks until you reach the boat. Use your heavy attack on the Piling to sail east. Run northeast and stand on the second mural to activate it. From the second mural run south and step onto the boat.
|

|
|
Use your heavy attack on the Piling to sail south. Run southeast until you see a fallen tree and use your heavy attack to chop through it. Run south past the fallen tree until you see a boat and step onto it. Use your heavy attack on the Piling to sail west. Run southeast past the scorched cracks until you see a standing tree. Chopped down the standing tree and run across it to the east. Run south and continue past the scorched cracks until you see another standing tree. Chop down the standing tree to cross over to the south. Continue running south and step onto the third mural to activate it.
|

|
|
Run west from the mural and step onto the boat. Use your heavy attack on the Piling to sail to the west. Run southwest until you see a standing tree surrounded by scorched cracks. Chop down the standing tree to create a bridge over the scorched cracks to the west. Run west until you reach the boat and step onto it. Use your heavy attack on the Piling to sail to the west. Run west dodging the scorched cracks until you reach a standing tree. Chop down to standing tree and cross over it. Run to the southwest until you see a boat and step onto it. Use your heavy attack on the Piling to sail to the west island. Run north and step onto the boat. Use your heavy attack on the Piling to sail north. Run north and step on the fourth mural to activate it.
|

|
|
Run southwest until you reach the standing tree. Chop down to standing tree and run across it to reach the other side. Run north and step on the boat. Use your heavy attack on the Piling to sail north. Run northwest and step onto the boat. Use your heavy attack on the Piling to sail to the west. Run southwest and step onto the boat. Use your heavy attack on the Piling to sail south. Run east until you reach the standing tree. Chop down the standing tree to reach the east island. Run across to the east island and immediately run north and step onto the boat. Use your heavy attack on the Piling to sail north.
|

|
|
Run to the northeast until you see a standing tree. Chop down the standing tree and run across it to reach the north. Run to the northwest and step onto the boat. Use your heavy attack on the Piling to sail west. Use your heavy attack on the Piling to sail north. Run north onto the fifth mural to activate it.
|

|
|
Run east from fifth mural and step onto the boat. Use your heavy attack on the Piling to sail east. Run east until you see the five activated murals. The teeth wall will come down, now that they’re activated. Run northeast past the descended teeth until you step on the stone slab in front of Ymir's Blood Rune to acquire it.
|

|
|
|
